<?php
$PAGE_TITLE = "Seamless Epoxy Cove Wall Base";
$HEAD_EXTRA = <<<'HTML'
<meta name="viewport" content="width=device-width, initial-scale=1"/>
<link rel="canonical" href="https://www.epoxy.com/720.aspx" />
	<meta name="description" content="Epoxy Coving Resin - For installing seamless epoxy base cove|seamless epoxy cove|seamless base cove floor to walls|for seamless flooring"/>
<meta name="keywords" content="epoxy cove, epoxy coves, epoxy coving, epoxy coving resin, epoxy cove resin, epoxy coves resin, epoxy coving resin system, heavy duty epoxy coving, heavy duty industrial epoxy coving, pigmented epoxy coving, multi-colored epoxy cove, multi-colored epoxy coving, multi-colored epoxy coves, multi colored epoxy cove, multi colored epoxy coving, multicolored epoxy coves, pigmented epoxy coving resin system, heavy duty industrial pigmented epoxy cove, cove, coving, coves, epoxy.com cove, epoxy.com coving, epoxy.com coves, solid colored epoxy coving, colored epoxy cove resin, colored epoxy cove resin system, colored heavy duty epoxy cove, colored heavy duty industrial epoxy coving, seamless epoxy cove, seamless epoxy cove resin system, seamless heavy duty industrial pigmented epoxy cove, heavy duty epoxy floor cove, heavy duty urethane floor coving, epoxy.com coving resin system, epoxy.com cove resin system, epoxy.com resin system coves, epoxy.com seamless cove," />
<meta name="copyright" content="1994 -2019 Epoxy Systems, Inc."/>
<meta http-equiv="reply-to" content="info@epoxy.com"/>
<meta name="contactname" content="Norm Lambert"/>
<meta name="contactorganization" content="Epoxy Systems, Inc."/>
<meta name="contactstreetaddress1" content="20774 West Pennsylvania Ave."/>
<meta name="contactcity" content="Dunnellon"/>
<meta name="contactstate" content="Florida"/>
<meta name="contactzipcode" content="34431"/>
<meta name="contactphonenumber" content="352-489-1666"/>
<meta name="contactfaxnumber" content="352-489-1625"/>
<style type="text/css">
.caption {
	font-family: Arial, Helvetica, sans-serif;
	font-size: medium;
	text-align:center;
	width:80%;

	margin:.3em 1em 1em 1em;
}
</style>
HTML;

include $_SERVER['DOCUMENT_ROOT'].'/includes/header.php';
?>
<div style="padding:5em 1em 5em 1em;">
        <hr style="width:90%"/>
        <h1>
            Epoxy.com Technical Data</h1>
        <h2 class="center">
            Installation Instructions 
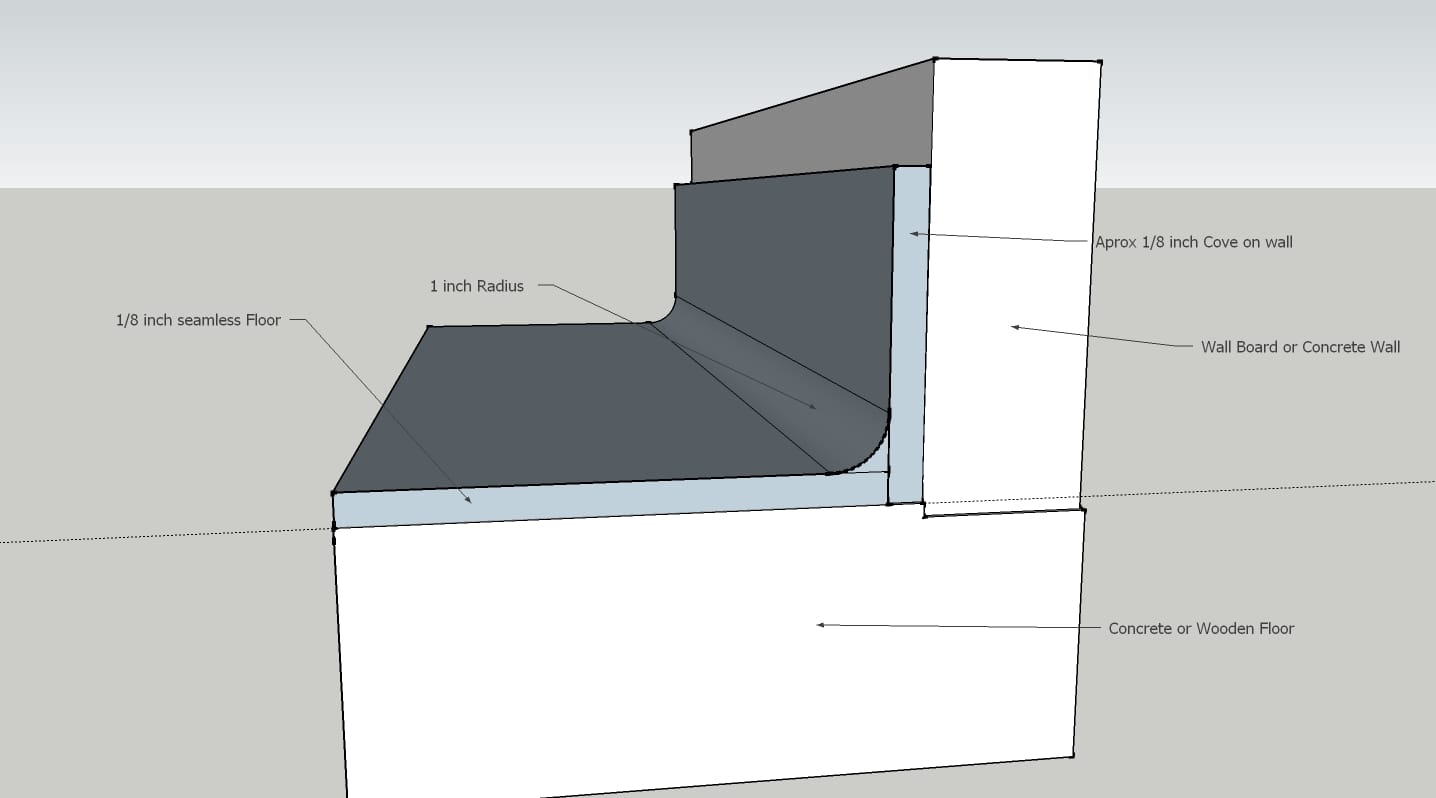
			Epoxy Cove Base<br/> Product #720 Cove Paste 
			Binder Method</h2>
        <h2>
            I. GENERAL INFORMATION</h2>
        <hr style="width:90%" />
        <p>
            Most<b> Epoxy.com FLOORING SYSTEMS </b>can be installed with an 
			integral cove base to provide seamless wall to floor protection. The 
			outline below explains mixing and installation procedures for each 
			type of system.</p>
        <h2>
            II. SURFACE PREPARATION</h2>
        <p>
            <b>Surface Preparation </b>is the most critical portion of any 
			successful resinous flooring system application. All substrates must 
			be properly prepared as outlined in <b>Epoxy.com Surface Preparation 
			Guide. </b>Specific attention should be paid to the following:</p>
        <blockquote>
            <blockquote>
                <p>
                    A. Concrete placement</p>
                <p>
                    B. Curing and finishing techniques of the concrete substrate</p>
                <p>
                    C. Age of concrete</p>
                <p>
                    D. Previous contamination of the substrate</p>
                <p>
                    E. Present condition of the substrate</p>
            </blockquote>
        </blockquote>
        <p>
            Also, the temperature and humidity conditions of the area to receive 
			the flooring system should be checked. An optimum room temperature 
			of 75&deg;F with a minimum slab temperature of 50&deg;F is required for 
			proper cure of the resin flooring system.</p>
        <h2>
            III. COVE BASE FOR Epoxy.com Product #15 QUARTZ SYSTEMS</h2>
		<p>
            If you are installing Epoxy.com Chip Flooring or and other Epoxy.com 
			Flooring or Mortar System Except for Epoxy.com Product #15 Quartz 
			System <a href="#Cove_For_Chip">skip ahead to Section IV</a>. </p>
        <p>
            Installations of an integral cove base with <b>Epoxy.com Flooring </b>
			is normally terminated at the floor line by cutting a straight line 
			at the bottom of the cove and installing the system up to that 
			point. The top of the cove can terminated with a divider strip. 
			Alternate method involves masking a line with Duct Tape at the top 
			of the cove. If using the duct tape method, be sure to remove the 
			duct tape before the cove sets up too much to remove the duct tape 
			properly.</p>
        <blockquote>
            <blockquote>
                <p>
                    A. Material Quantities</p>
                <blockquote>
                    <blockquote>
                        <p>
                            1. <i><a href="https://www.epoxy.com/899.htm">
							Epoxy.com #899 Primer</a>/ Low Modulus Binder</i> 1 
							gallon</p>
                        <p>
                            2. <i>Epoxy.com #720</i> Cove Paste Binder 1.25 
							gallons</p>
                        <p>
                            3.<i> <a href="https://www.epoxy.com/68.htm">
							Epoxy.com Quartz Granules</a></i><a
                                href="https://www.epoxy.com/68.htm"> </a>100 
							pounds</p>
                        <p>
                            4. <i>Epoxy.com #60 Cove Powder</i> 1 quart</p>
                        <p>
                            &nbsp;</p>
                    </blockquote>
                </blockquote>
              
                <p>
                    Recommended batch quantities</p>
                <blockquote>
                    <blockquote>
                        <p>1 Quart <i>Epoxy.com #720</i> part A &amp; 1 cup <i>
							Epoxy.com #720</i> part B</p>
                        <p>2. 24 pounds <i>Epoxy.com Colored Quartz Granules </i></p>
                       	<p>3. 1 Cup <i>Epoxy.com # 60 Cove Powder</i></p>
                        <blockquote>
                            <p>Estimated Batch Coverage: 22-25 lineal feet 
									at <sup>1</sup>/8&quot;</p>
                                
             		</blockquote>
                   </blockquote>
                </blockquote>
           
                <p>
                    B. Installation--Priming</p>
        
       
                <p>
                    It is very important to prime the wall surface prior to 
					installing cove base. Priming insures maximum adhesion to 
					the prepared substrate and helps mixed cove material to 
					&quot;hang&quot; on the wall.</p>
				  <!-- worked to here -->	
                       <blockquote>
                            <blockquote>
                                    <p>1. Mixing <b><i><a href="https://www.epoxy.com/899.htm">
										Epoxy.com #899</a></i></b> Low Modulus Epoxy 
										Primer</p>
                                    <blockquote>
                                     
                                        <p>
                                            a. Stir each component prior to 
											mixing.</p>
                                        <p>
                                            b. Mix two (2) parts by volume of 
											Part A (Base) with one (1) part by 
											volume of Part B (Hardener) for 
											three minutes with a low speed 
											electric drill mixing paddle.</p>
                                        <p>
                                            c. If thinning is desired, add no 
											more than one pint of xylene per 
											gallon of epoxy at time of mixing.</p>
                                        <p>
                                            d. <i><b>Mix only that amount of 
											material that can be used in 40 
											minutes.</b></i></p>
										<p>
                                            <b><i>e. Apply only as much primer 
											as you can apply the Product #720 
											Cove mix to before the 899 Primer 
											hardens and is no longer tacky. </i>
											</b></p>
                                    </blockquote>
                                    
                                    <p>
                                        2. Application--Brush primer onto the 
										wall surface.</p>
                                    <p>
                                        3. Allow Primer to tack-up.</p>
                            </blockquote>
                        </blockquote>
                   
                        <p>
                            C. Installation--Cove Base</p>
				<p>
                            <strong>Note: Cove Base should be applied into the 899 
							Primer, while the 899 Primer is still tacky. If the 
							899 Primer is no longer tacky, reapply the 899 
							Primer.</strong></p>
                        <blockquote>
                            <blockquote>
                                <p>
                                        1. Mixing <b><i>Epoxy.com #720</i> Cove 
										Paste Binder, Quartz Granules, &amp; Cove 
										Powder</b></p>
                                    <blockquote>
                                        
                                        <p>
                                            a. Stir each component prior to 
											mixing.</p>
                                        <p>
                                            b. Mix four (4) parts by volume of 
											Part A (Base) with one (1) part by 
											volume of Part B (Hardener) for 
											three minutes with a low speed 
											electric drill mixing paddle.</p>
                                        <p >
                                            c. Transfer to KOL mixer and add <i>
											Epoxy.com Cove Powder</i> to the 
											premixed <i>Epoxy.com #720</i>.</p>
                                    </blockquote>
                            
                        
         <p style=" background-color:#E1E1E1; padding:1em; margin:1em; border:thin black outset; font-style:italic;">
                            Note: Epoxy.com recommends the use of a KOL 
							Mixer when preparing cove base material. 
							Insufficient mixing of cove base material will 
							result in a stiff, dry, and hard to trowel blend 
							that does not have sufficient wetting of aggregate 
							to insure proper bonding to the substrate.</p>
                          
                              
                                        <blockquote>
                                                           <p>
                                    d. Continue mixing while adding <i>Epoxy.com 
									Colored Quartz Granules</i>.</p>
                                <p>
                                    e. Mix resin/aggregate mortar for 3 to 4 
									minutes or until aggregate uniformly is wet.</p>
                    </blockquote>
                    <p>
                        2. Application</p>
                    <blockquote>
                        <p>
                            a. Trowel cove base mixture vertically onto primed 
							wall surface at 1/8&quot; thickness.</p>
                        <p>
                            b. Place material at the cove and form cove radius 
							using and appropriate cove trowel.</p>
                        <p>
                            c. Terminate bottom of cove base and install quartz 
							flooring up to base.</p>
                    </blockquote>
                </blockquote>
              </blockquote> 
           </blockquote> 
        </blockquote>                    
        <h3><a name="Cove_For_Chip">IV. COVE BASE FOR</a> Epoxy.com MORTAR, and Epoxy.com 
		Chip Flooring Systems</h3>
                               <p>
                    Installations of an integral cove base with <b>Epoxy.com 
					Solid Colored Floor Systems</b>
                    are normally terminated at the floor line by cutting a 
					straight line at the bottom of the cove and installing the 
					system up to that point. The top of the cove is preferably 
					terminated with a divider strip as pictured in the following 
					pages.</p>
                <blockquote>
                    <blockquote>
                        <p>
                            A. Material Quantities</p>
                        <blockquote>
                            <blockquote>
                                
                                    <p>
                                        1.<a href="https://www.epoxy.com/899.htm"> <i>
										Epoxy.com #899</i></a> Primer/Low 
										Modulus Binder 1 gallon</p>
                                    <p>
                                        2. <i>Epoxy.com #720</i> Cove Paste 
										Binder 1.25 gallons</p>
                                    <p>
                                        3.<i> Epoxy.com Blended Mortar Aggregate</i> 
										100 pounds</p>
                                    <p>
                                        4. <i>Epoxy.com #60 Cove Powder</i> 1 
										quart</p>
                            </blockquote>
                        </blockquote>
                        <p>
                            Recommended batch quantities</p>
                        <blockquote>
                            <blockquote>
                                                                    <p>
                                        1. 1 QT <i>Epoxy.com #720</i> part A &amp; 1 
										cup <i>Epoxy.com #720 </i>part B</p>
                                    <p>
                                        2. 21 pounds <i>Epoxy.com Blended Mortar 
										Aggregate</i></p>
                                    
                                    <p>
                                        3. 1 pint <i>Epoxy.com Cove Powder </i></p>
                                   <blockquote>
                                            <p> <b>
                                                Estimated Batch Coverage: 22-25 
												lineal feet at 1/8 inch thick.</b></p>
                                                          </blockquote>
                       </blockquote>
                   </blockquote>
                                       <p>
                        B. Installation--Priming</p>
               
               
                <p>
                    It is very important to prime the wall surface prior to 
					installing cove base. Priming insures maximum adhesion to 
					the prepared substrate and helps mixed cove material to 
					&quot;hang&quot; on the wall.</p>
               
                  
                       <blockquote>
                           <blockquote>
                                                                    <p>
                                        1. Mixing <b><i>Epoxy.com #899</i> </b> Low 
										Modulus Epoxy Primer</p>
                                   <blockquote>
                                       
                                        <p>
                                            a. Stir each component prior to 
											mixing.</p>
                                        <p>
                                            b. Mix two (2) parts by volume of 
											Part A (Base) with one (1) part by 
											volume of Part B (Hardener) for 
											three minutes with a low speed 
											electric drill mixing paddle.</p>
                                        <p>
                                            c. If thinning is desired, add no 
											more than one quart of xylene per 
											gallon of epoxy at time of mixing.</p>
                                        <p>
                                            d. <i><b>Mix only that amount of 
											material that can be used in 40 
											minutes.</b></i></p>
										<p>
                                            <b><i>e. Apply only as much primer 
											as you can apply the Product #720 
											Cove mix to before the 899 Primer 
											hardens and is no longer tacky. </i>
											</b></p>
                                   </blockquote>
                                    
                                    <p>
                                        2. Application--Brush primer onto the 
										wall surface.</p>
                                    <p>
                                        3. Allow Primer to tack-up.</p>
                           </blockquote>
                       </blockquote>
                                                <p>
                            C. Installation--Cove Base</p>
                            <p>
                            <strong>Note: Cove Base should be applied into the 899 
							Primer, while the 899 Primer is still tacky. If the 
							899 Primer is no longer tacky, reapply the 899 
							Primer.</strong></p>

                       <blockquote>
                           <blockquote>
                                                                    <p>
                                        1. Mixing <b><i>Epoxy.com #720</i> Cove 
										Paste Binder, Mortar Aggregate, &amp; Cove 
										Powder. </b></p>
                                   <blockquote>
                                       
                                        <p>
                                            a. Stir each component prior to 
											mixing.</p>
                                        <p>
                                            b. Mix four (4) parts by volume of 
											Part A (Base) with one (1) part by 
											volume of Part B (Hardener) for 
											three minutes with a low speed 
											electric drill mixing paddle.</p>
                                        <p>
                                            c. Transfer to KOL mixer and add <i>
											Epoxy.com Cove Powder</i> to the 
											premixed <i>Epoxy.com #60</i>.</p>
                           </blockquote>       
                          <p style=" background-color:#E1E1E1; padding:1em; margin:1em; border:thin black outset; font-style:italic;">Note: Epoxy.com recommends the 
							use of a KOL Mixer when preparing cove base 
							material. Insufficient mixing of cove base material 
							will result in a stiff, dry, and hard to trowel 
							blend that does not have sufficient wetting of 
							aggregate to insure proper bonding to the substrate.</p>
                        <blockquote>      
                                <p>
                                    d. Continue mixing while adding <i>Epoxy.com 
									#77 Mortar Aggregate</i></p>
                                
                                <p>
                                    e. Mix resin/aggregate mortar for 3 to 4 
									minutes or until aggregate uniformly is wet.</p>
                   </blockquote>
                    <p>
                        2. Application</p>
                   <blockquote>
                        <p>
                            a. Trowel cove base mixture vertically onto primed 
							wall surface at 1/4&quot; thickness.</p>
                        <p>
                            b. Place material at the cove and form cove radius 
							using and appropriate cove trowel.</p>
                        <p>
                            c. Terminate bottom of cove base and install mortar 
							flooring up to base.</p>
                   </blockquote>
               </blockquote>
               </blockquote>                 <p>
                    D. Installation--Grouting and Sealing</p>
               <blockquote>
                                            <p>
                            The grouting and sealing of the floor should be 
							performed over the entire area receiving the system. 
							The cove base should also receive the same grout and 
							seal coats as the finished floor in order to provide 
							proper performance and appearance. See installation 
							instructions for each system to be installed.</p>
                                </blockquote>
       </blockquote></blockquote>
   <p>Here is additional information on the
   <a href="http://www.epoxysystems.com/Seamless_Epoxy_Cove_Installation_720.aspx">
   installation of this cove</a>.</p>
		<p>Do you need to estimate the material required for your job? Use the 
   <a href="epoxy_calculators/Epoxy_Cove_Material_Calculator.aspx" target="_blank">Epoxy.com Epoxy Coving Material Calculator</a>.</p>
       <div style="width:auto;">
     <a href="images/cove.jpg">
       				<img alt="Epoxy.com Product #720 Epoxy Seamless Floor Cove Detail" src= "images/cove.jpg" height="auto" width="80%" /></a>
       				<p class="caption"><strong>Click the Picture Above for a Larger View</strong></p></div>
      

       <p>&nbsp;<asp:SiteMapDataSource ID="SiteMapDataSource1" runat="server" /></p>
    </div>
<?php include $_SERVER['DOCUMENT_ROOT'].'/includes/footer.php'; ?>
